

How To Install Wim File
This browser is no longer supported.
Upgrade to Microsoft Edge to take advantage of the latest features, security updates, and technical back up.
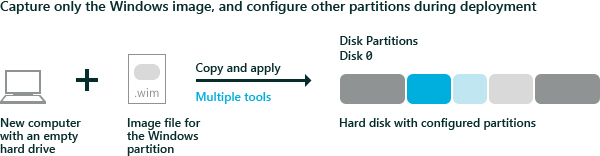
Capture and apply a Windows prototype using a unmarried .WIM file
Capture a Windows image (.WIM) file and utilize it to deploy Windows to new devices.
You tin start with either the install.wim file from a Windows distribution ISO, or you tin can generalize and capture a running Windows image into a .WIM file.
WIM files simply capture a unmarried partition. Y'all can usually capture just the Windows partition, and so use files from that image to set up up the rest of the partitions on the drive. If you've created a custom partition configuration, run across Capture and Utilise Windows, System, and Recovery Partitions.
Capture the epitome
-
If you've booted into Windows, generalize the epitome so that it tin be deployed to other devices. For more information, meet Sysprep (Generalize) a Windows installation.
-
Boot the device using Windows PE.
-
Optional Optimize the image to reduce the time it takes your device to boot after you employ the epitome. Optimizing an image especially helps when you're building an image that you'll exist deploying to many machines, similar in a build-to-stock scenario.
DISM /image:C:\ /optimize-epitome /boot -
Capture the Windows partition. For example:
Dism /Capture-Image /ImageFile:"D:\Images\Fabrikam.wim" /CaptureDir:C:\ /Name:FabrikamWhere D: is a USB flash drive or other file storage location.
Employ the paradigm
-
Boot the device using Windows PE.
-
Wipe the hard bulldoze and gear up up new hard disk partitions using a script. Employ CreatePartitions-UEFI.txt (or CreatePartitions-BIOS.txt for older, legacy BIOS devices).
diskpart /s CreatePartitions-UEFI.txt -
Utilize the images using a script.
D:\ApplyImage.bat D:\Images\Fabrikam.wim
Sample script
Below is an simple sample script that applies an image to a deejay that'southward been partitioned using i of the hard disk sectionalization scripts from step 2.
rem == ApplyImage.bat == rem == These commands deploy a specified Windows rem image file to the Windows partition, and configure rem the organization partitioning. rem Usage: ApplyImage WimFileName rem Example: ApplyImage E:\Images\ThinImage.wim == rem == Set high-performance power scheme to speed deployment == call powercfg /s 8c5e7fda-e8bf-4a96-9a85-a6e23a8c635c rem == Apply the prototype to the Windows sectionalization == dism /Apply-Image /ImageFile:%1 /Index:1 /ApplyDir:W:\ rem == Copy boot files to the System sectionalization == Westward:\Windows\System32\bcdboot W:\Windows /s S: :rem == Copy the Windows RE image to the :rem Windows RE Tools partition == dr. R:\Recovery\WindowsRE xcopy /h W:\Windows\System32\Recovery\Winre.wim R:\Recovery\WindowsRE\ :rem == Register the location of the recovery tools == W:\Windows\System32\Reagentc /Setreimage /Path R:\Recovery\WindowsRE /Target Westward:\Windows :rem == Verify the configuration status of the images. == West:\Windows\System32\Reagentc /Info /Target W:\Windows Deploy Windows using Total Flash Update (FFU)
Capture and Apply Windows, Arrangement, and Recovery Partitions
Configure UEFI/GPT-Based Hard Drive Partitions
Configure BIOS/MBR-Based Hard Bulldoze Partitions
BCDboot Command-Line Options
REAgentC Control-Line Options

Source: https://docs.microsoft.com/en-us/windows-hardware/manufacture/desktop/capture-and-apply-windows-using-a-single-wim
Posted by: carrlenct1978.blogspot.com
0 Response to "How To Install Wim File"
Post a Comment